Detecting off The Land - Hash Lookups from Native Tooling
About The Project
Several Red Team projects exists to “live off the land” and avoid introducing additional executables into an environment. This gives Red Teamers and adversaries an advantage to not risk something within their toolkit from gettin caught by the latest and greatest EDR. But what about the Blue Teamers? The DFIR engineers out there tireless working to ensure the saftey of an organization? This blog post highlights how to integrate Team Cymru’s Malware Hash Registry with your workflow for quickly identifying whether or not something requires more investigation within your environment. Finally, we’ll look at prototyping a custom proof-of-concept solution in the homelab with minimal lines of code.
Team Cymru’s Malware Hash Registry
Per Team Cymru’s website, the Malware Hash Registry (MHR) is a
“free malware validation tool that searches against 30+ antivirus databases and our own malware database to serve as a force multiplier for malware detection and validation. It’s like having an army of malware detectors giving you insight single antivirus solutions cannot.”
Notably, this service allows lookups over multiple protocols including DNS, whois, and directly connecting to their service over netcat. For this blog post, we’ll explore the whois protocol, and leave the rest as an exercise for you dear reader. Per their documentation, executing a whois lookup in the following format will respond with indication of howmany EDR products detected a given hash to be malicious. The exact syntax below was taken from their documentation here.
whois -h hash.cymru.com <hash>

# Response
# hash      Unix-Epoch                  AV-Hit-%
<hash>      <time>       <number of AVs that detected something bad>
Automating Lookups with Unix Utilities
Given the ability to perform hash lookups over whois, lets go ahead and automate this process.
Suppose a scenario exists where you’re suspicious of a given binary running out of /tmp/.
By stiching together a handful of commands, it’s trivial to a rudimentary A/V scanner leveraging the MHR as your backend database. This is achievable via the command below.
$> find /tmp/ -exec md5sum {} \; | awk '{print $1}' | xargs -n 1 whois -h hash.cymru.com $1
The command above grabs a MD5 hash of all of the files within /tmp/, and pipes the output to awk. By default, the md5sum utility produces an output of hash file_path. At this point in time, we only care about the hash so the filepath is disregarded. Next, the hash is passed to xargs. xargs lets us take output from stdin and position it appropriately in follow on commands. This is used to pass the hash value to the end of the whois command to successfully perform the lookup. The output below shows non-malicious data receiving a “NO_DATA” response, but a file did recieve a status of “malicious” via the presence of 65 EDR products stating that it is malicious.
44d88612fea8a8f36de82e1278abb02f 1669621232 65
92d6e14254d50bfe6d3709a7e0af0091 NO_DATA
5be3cac7fa8f7a4d8c99ec783f1a7907 NO_DATA
ce5d1c702a9edfa2d63bf255e618e76a NO_DATA
At this point, there’s no additional information as to the “why”, but it does make an easy first response answer of “is this something I should triage?”. Lets explore implmenting our own proof-of-concept to provide more context while following this Linux native tooling for hash lookups.
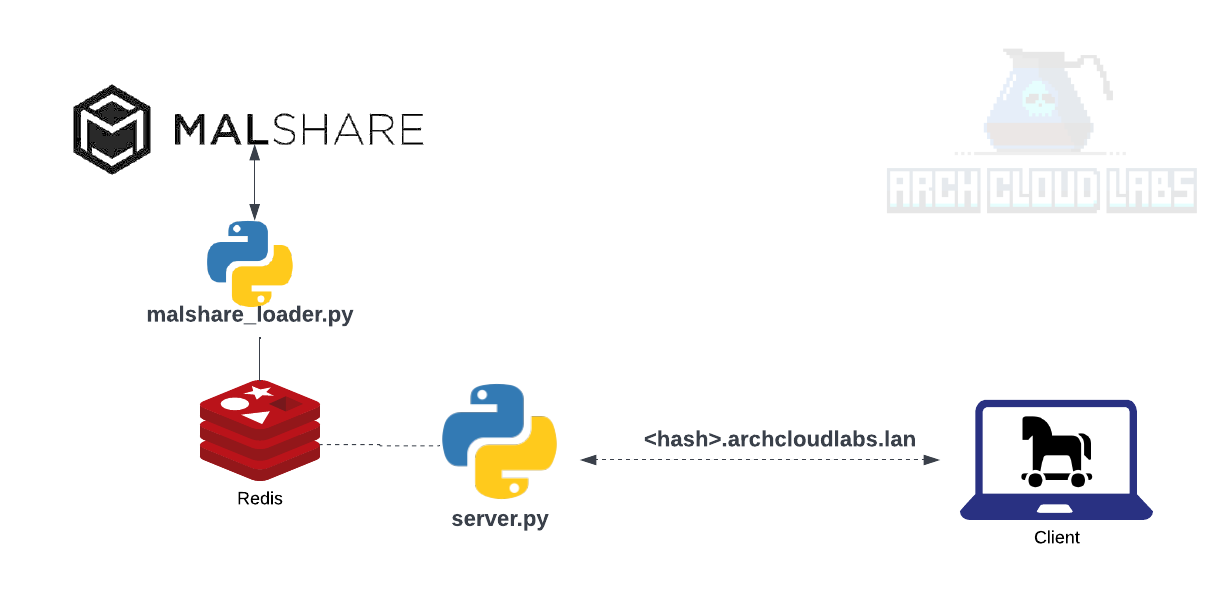
Building Our PoC Own Solution
A limitation demonstrated is the ability to gain further context as to the “why” we care that a given file was detected as malicious. If we were to build our own solution, one would require a data source of malicious hashes with addition to context to said “maliciousness".To achieve this goal of a lose protoype, we’ll leverage https://malshare.com for their daily hash dump of user submitted content. In addition to the daily dump of hashes, a generous free API is offered which gives the end user access to obtain the context around the malicious hash desired by DFIR professionals. The loading of this data into Redis can be achieved with a few lines of Python shown below.
#!/usr/bin/env python3
import requests
import json
import os
import redis

master_hash_list = "https://malshare.com/daily/malshare.current.txt"
api_key = os.getenv('MALSHARE_APIKEY')
r = redis.Redis(host='localhost', port=6379, db=0)
data = requests.get(master_hash_list).text.split("\n")

for entry in data:
    url="https://malshare.com/api.php?api_key=%s&action=details&hash=%s" % (api_key, entry)
    resp = requests.get(url)
    try:
        names = (resp.json().get('FILENAMES')[0])
    except:
        names = ''
    r.set(entry, names)
For the custom server , we’ll use make trivial UDP server that responds to DNS requests from the dig client. The official Python documentation has example UDP servers that we can modify to get up and running. The result is something like the code shown below
#!/usr/bin/env python3
import socket

if __name__ == '__main__':

    sock = socket.socket(socket.AF_INET, socket.SOCK_DGRAM)
    server_address = ('localhost', 9953)
    sock.bind(server_address)
    # recv data forever ...
    while True:
        data, address = sock.recvfrom(4096)
        if data:
            print(data)
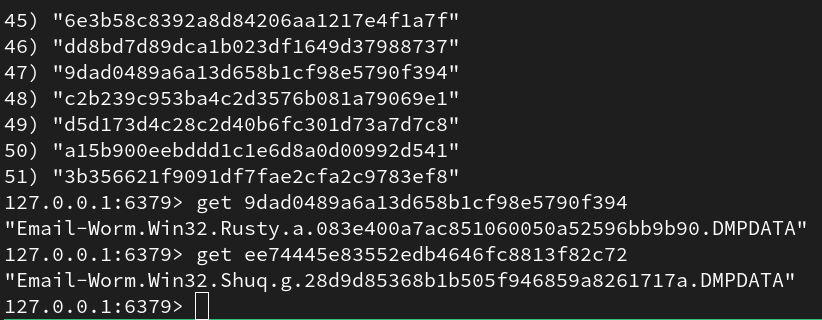
Inspecting the redis server via the redis-cli shows we’re successfully loading content into our Redis database.
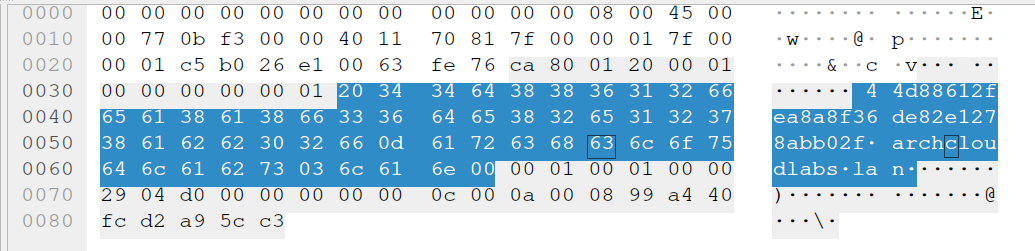
Next, we’ll set a breakpoint after the recieved data and reference Wireshark to see the bytes we need to parse out. The highlighted bytes below are parsed via data[13:45] as the subdomain to archcloudlabs in this proof-of-concept will always be the length of a MD5 checksum (32 characters hence the range 13 to 45 within the data byte array).
    while True:
        data, address = sock.recvfrom(4096) # 4096 bytes :eyes emoji:
        if data:
            print(data[13:45]) # printing subdomain to stdout
            md5_hash = data[13:45] # hash subdomain offset within dig DNS datagram
            resp = r.get(md5_hash) # get data from redis, empty string if nothing is available
            data = data.replace(md5_hash, resp) # replace data
            sock.sendto(data, address) # send back to client
Finally, we’ll leverage the dig utility to query our UDP server to respond to the client.
Note, there’s no error checking, and the parsing we’re doing is hardcoded to expect a format of <md5sum>.archcloudlabs.lan. Anything else will break said solution as the offset would be different, but again, this is a simple prototype not a production application. The image below shows the content not conforming to the expected dns response thus the warnings. However, it achieves our goal of building a slightly
more informative DNS based query tool for malware hashes. What a fun afternoon project.

Beyond The Blog
To make this proof-of-concept a bit more reliable, containerizing the proof-of-concept and setting the restart policy to unlessStopped can help any query that resulted in too large for the buffer (4096) bytes leading to a crash. Additionally having a CronJob to regularly import hashes into said Redis database would keep this cache fresh. Ideally, some monitoring around the memory usage and total querys could help track application metrics over time, but that is beyond the scope of this single blog post. Maybe, we’ll explore that in the next one. Finally, leveraging something like ngrok could help expose this homelab service to some friends, and then you’ d have some “customers” using your service.
For those interested in exploring this further, consider using a legitimate 3rd party library that implements the DNS protocol specification rather than parsing arbitrarily bytes. With this fragile implementation, I hope to demonstrate what can be strung together in the homelab.
Thank you for reading, please consider sharing if you found this interesting.