New Homelab
Why Build it? - The Origin Story
Scrolling through Twitter and seeing my InfoSec friends and role models post crazy malware analysis writeups, CVE disclosures, and custom tool blog posts; I ask myself “How can I become better?”. How can I advance and diversify my skillset from the 9-5 I currently have? From my experience “homelabbing”, CTFs and conference talks have increased my perspective and exposure to technologies and ideas I otherwise would not normally encounter.
My day-to-day is focused mostly on DevOps/Software Engineering related tasks; but what if I want to advance my malware analysis/forensic/red team skillset? This is where homelabbing and experimentation comes into play.
Grab a 30 day trial of $SIEM technology and try it out? Sure, why not? Oh, a new vulnerability is out for $CMS? Cool, throw it in a VM and play with it. What does the network traffic look like for said vuln? What logs are generated? These are the questions that get me jazzed and fuel my weekend projects.
I believe an investment for the sake of self-education and advancing one’s knowledge in a given domain is money well spent. That being said, there are plenty of ways you can blow a lot of cash in computing and not necessarily get the best bang for your buck. This past summer I’ve upgraded my homelab and thought that documenting my process might help a fellow “homelabber” or security enthusiast.
The Equipment
Networking Equipment
My physical home network stack is made up of Ubiquiti equipment and a Qotom machine running PFSense. The PFSense box has four Gigabit ports and an Intel Core i3 with 8GB of RAM and a 16GB SSD. While the SSD is quite small, it’s perfect for experimenting with PFsense. If you plan on storing logs locally and not forwarding them to any kind of cental log management, then you’re going to want to spring for a larger SSD or leverage an onboard USB port for external storage. This is obviously not something you’d want to do in a production environment, but hey it’s a homelab. For Ubiquiti equipment, I have a Ubiquiti EdgeSwitch and an Unifi-AC-Pro for an access point.
Hypervisor Hardware - Intel NUCs
In June, I was planning my new homelab build. The new Ryzen Thread Ripper was coming out in a month, but I wouldn’t have enough space or money to build a couple of these and I wanted something small and portable. I chose the Intel Hades Canyon given the hardware and the price was significantly discounted on Amazon Prime day. The reason I wanted something portable was for conference CTFs and a few red vs blue competitions I’m fortunate enough to be apart of. The Intel NUC family of machines offers out of the box ESXi support (though they’re not officially supported) and don’t consume an excessive amount of power. The small form factor keeps noise low, the electricity bill economical and can easily be moved from location-to-location. I chose the Hades Canyon due to the built-in dual NIC and unofficial support for 64GB of RAM. I’d like to point out that a lot of my initial research on these NUCs landed me on Virtually Ghetto’s blog post.
I purchased two Hades Canyon NUCs on Amazon Prime day and later bought a third from a co-worker. Each NUC has 64GB of RAM and a 1TB of Samsung’s Evo 970 Plus NVMe drive. The Samsung Evo 970 plus series benchmark close to Samsung’s flagship NVMe drive, the 970 Pros. Samsung Evo Plus’s are significantly less expensive than the Samsung Evo Pros. At the time of my purchase, the Samsung Evo Pro series was almost double the cost of the Samsung Evo plus series. With all this being said, the Ryzen product line’s core count is significantly higher than anything in an Intel NUC today and would make an excellent virtualization platform. If it wasn’t for the fact I wanted to travel with some of my homelab, I would have likely gone with a Thread Ripper. If you have the space and are looking for a virtualization build, you should consider a Thread Ripper.
Paid - Virtualization Solutions
For core virtualization in this homelab, I chose ESXi. As a VMUG Advantage (VMWare User Group) member I have access to a large portion of the VMware software suite. This includes VMWare Workstation, ESXi, VCenter, VSAN, etc… While registering I found a coupon code online knocking the price of a year membership down to USD 160 from USD 200. VMWare Workstation Pro alone can cost upwards of USD 200 (depending on whether or not it’s on sale).
Free - Virtualization Solutions
If you’re not interested in a paid solution, I would recommend Proxmox. Proxmox provides a nice GUI on top of KVM/QEMU for Linux virtualization. It also supports LXC containers. For some time I used Proxmox as my virtualization solution and it worked quite well. I chose ESXi for my homelab upgrade to increase my ESXi knowledge, and personally I prefer working with VMWare’s networking interfaces rather than OpenVswitch with KVM.
My experience with only using Virt-Manager with QEMU/KVM to connect to remote virtual machines running on well-resourced servers has also been pleasant. I would absolutely recommend starting with Proxmox or just leveraging virt-manager to connect to a beefier host those starting with homelabbing. You can even stand up a few AWS EC2/Digital Ocean droplets and leverage KVM locally to connect to the remote hosts to administer virtual machines. This works well for those with just a laptop/underpowered desktop who are looking to expand their capability.
The Networks
LAN
After obtaining the Intel NUCs and performing the initial ESXi installs and VCenter deployment, I began looking at how I wanted to perform network segmentation. I settled on having four different subnets for different types of projects. The subnets break down as follows:
- A core service VLAN (10.10.0.0/16) providing core services.
- A PWN VLAN (10.20.0.0/16) with vulnerable machines within a Windows domain. I’m currently building this out, so it is not represented in the diagram below.
- A DevOps VLAN (10.30.0.0/16) to play with DevOps and various software utilities I’m currently using a mix of CentOS 7 and Ubuntu 18.04 machines.
- A Malware VLAN (10.40.0.0/16) with no direct internet access. A FreeBSD jump box with two NICs will be used to share samples with the Analysis LAN. The bridged adapter will be cut before executing samples.
The Visio diagram below illustrates the broad network segmentation breakdown.
Why /16’s? During experimentation, I plan on breaking these down further and
having the third octet for each is reserved for something specific within each
domain. For example, 10.20.1.0/24 could be the pwnable Windows domain, while
10.20.2.0/24 would be only for Linux hosts.
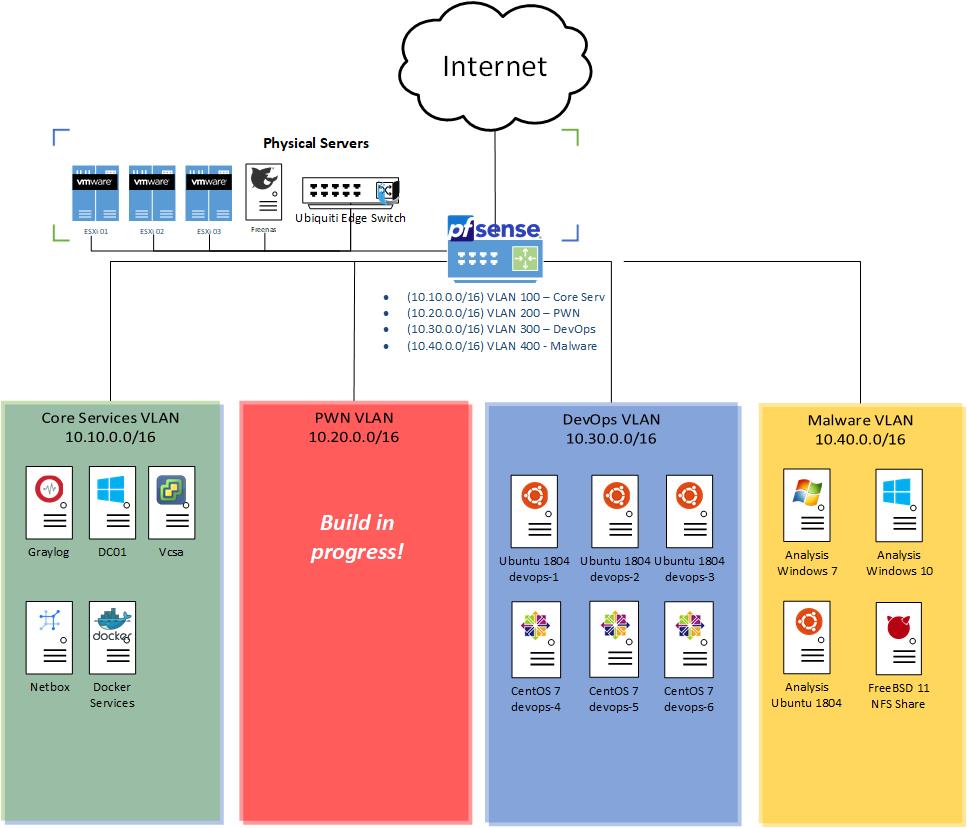
Within the “Physical Servers” grouping there’s a FreeNAS box. This is mostly used as an ISO share along with a local software share (Ubuntu repos, local copy of Sysinternals, etc…) Each of these networks exist within a different VSwitch port group for VLAN appropriate VLAN tagging. Each Intel NUC is plugged into a trunk port on a Ubiquiti managed switch that uplinks to a PFSense router. My core PFSense router handles all traffic and firewalling appropriately preventing anything on the Malware VLAN from talking to other network resources via an explicit deny any-to-any rule. PFSense has a syslog forwarder to a Graylog instance for further logging and data analytics.
Cloud
With the plethora of IAAS providers that exist today, it is easier than ever to stand up and tear down testing environments. It’s often more cost-effective to go this route for experimentation depending on what your resource requirements are. I leverage AWS and Digital Ocean for different services.
I use Digital Ocean for most compute instances as I’ll know exactly what my cost will be at the end of the month. AWS offers cost forecasting and you can set billing alerts, but for just spinning up machines for quick experiments/CTFs /whatever I choose Digitalocean. I do make one exception and that’s in the case of honeypots that I host in AWS. In my personal experience, a lot more bots are targeting the AWS address range and I have more fruitful honeypots if I host there.
Home SoC Logging
Now that I have a base a virtualization platform deployed, network segmentation,
and some VMs up and running it’s time to consider logging. To get up and running
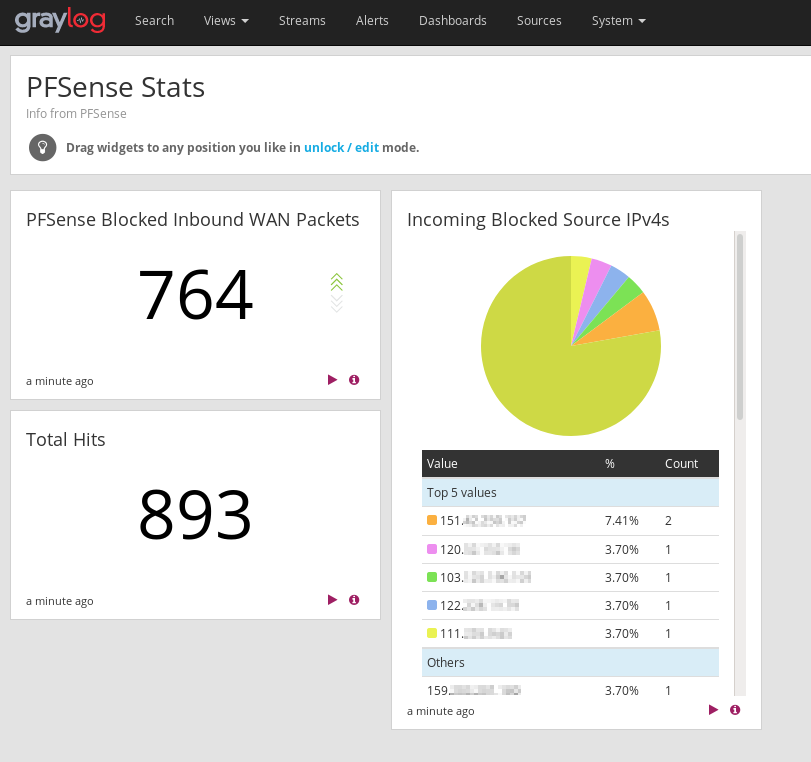
I’m using Graylog. My Graylog instance is getting data from PFSense via Syslog.
By default, Graylog doesn’t provide the best parsing of PFSense syslogs. This
is where the Graylog Marketplace comes to the rescue. The Graylog
Marketplace
has several plugins and extensions to help enrich/parse your data. A couple
quick queries later and we have a nice live dashboard of IPs that are hitting
some Firewall rules explicitly set on my WAN interface. The image below shows
data populating said dashboards after just a few minutes.
Upwards & Onwards
Now that hardware is running, VMs are on, and Graylog is ingesting data, it’s time to start making things and breaking things. Thank you for taking the time to read the first blog post.